
Installing a linux virtual machine on ARM64/Odroid N2
22 Feb 2022
As has been the case since my first attempts at linux around 1997, it’s always a challenge. Everything changes quickly, so lots of things break and the documentation is always out of date. Nevertheless, more and more becomes possible and the excitement never fails to keep up with the frustration.
In recent years, the available ARM hardware has become very exciting. After having played with an Odroid C2 (fun for LibreELEC, haven’t used it for much more), an NanoPi Neo2 (Fantastically small, not very powerful but the aluminium housing is quite irresistible), now is the turn for an Odroid N2+. Wat a beast! Apparently the IO is not very fast, but the processor is great. And the Homeassistant Blue version is quite pretty.

I was trying to install specific stuff on it, and learned some lessons w.r.t. the use of libvirt/KVM/QEMU on this ARM64/aarch64 platform. These were some fun lessons. I am using Armbian, in general.
I always wonder where we would be without the internet. Only with lots of searching, would I have been able to solve my problems. And even then, it’s been hours and hours of experimentation…
Kernel error on some older linux kernels
I ran into a specific error when starting a virtual machine running under Armbian Buster (Debian) as a host OS.
qemu-system-aarch64: …/target/arm/helper.c:1948: pmevcntr_rawwrite: Assertion `counter < pmu_num_counters(env)’ failed.
Quite an obtuse failure message. Thanks to people who are kind enough to document their struggles, it is clear that this is a kernel bug with the 5.8 kernel. The easiest way out, therefore, was to switch to a newer kernel.
First I was concerned, because one of my guests requires a Debian OS (and Armbian does not have the newer kernels for Debian), but since we are only updating the host OS, we are fine. I ended up switching to the Jammy variant of Armbian (Ubuntu, kernel 5.15) and it resolves this issue.
Installing Docker into Debian on a libvirt/KVM/QEMU Debian guest OS
Home assistant supervised recommends the simple method of installing Docker by piping a script to the shell. I do not like this, because of security concerns. Perhaps it is overly cautious, but I prefer to know what code I am running (I know, what’s in de packages themselves, right…?).
Because I want to run in a QEMU/libvirt virtual machine, it is easiest to configure everyting using the cloud-config file.
I found a nice tip on how to install Docker through cloud-config, which fits my desire. However, it requires GPG to be installed, which is not the case on the Debian cloud images that I’m using.
The tip is an example for an Ubuntu guest, but does not transfer cleanly to Debian.
So, how to fix this?
I ran into a discussion in a Debian mailing list which documents their preferred solution. It explains that there are several reasons to not use the proposed method, including that the keyservers are not seen to be future-proof. They propose including the key into the cloud-config file and writing it to a place that apt can find. It works, apart from a small typo: the write_files module needs an array, so the path entry needs a dash.
I added groups and it looks something like this (PGP key from the Docker repository):
#cloud-config
write_files:
  path: /usr/share/keyrings/docker.asc
  owner: root:root
  permissions: '0644'
  content: |
    ---- BEGIN PGP PUBLIC KEY BLOCK -----
    ....

users:
  - name: myname
    groups: [sudo, docker]

groups:
  - docker

apt:
  sources:
    docker.list:
      source: "deb [signed-by=/usr/share/keyrings/docker.asc] https://download.docker.com/linux/debian buster stable"

packages:
  - docker-ce
  - docker-ce-cli
  - ... all my other requirements
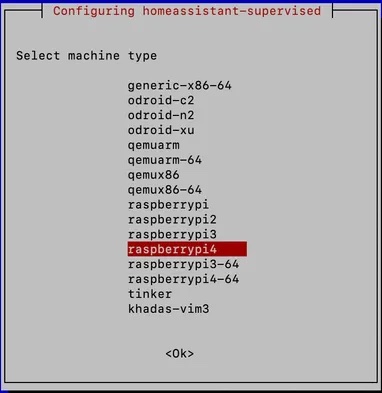
Setting Homeassistant Supervised machine type from command line install
The homeassistant-supervisor can be installed using the instructions on the Homeassistant Github. These instructions do not, however, explain how to install Homeassistant Supervised programmattically, that is non-interactively. The installer actually wants to know your machine type, so will present you with a menu. Since I was installing using Ansible at first, and later using cloud-config, there was no way to provide this information interactively. So how do you set ha/machine-type programmattically?
It turns out that this is a general mechanism called debconf. It’s the mechanism that Debian uses to configure its package settings. In some ways it is very nice, because it also allows you to change settings on already-installed packages using dpkg-reconfigure, etc.
The key to what I want, then, is to preseed the database with the desired setting. If the package is well designed (it seems to be), it should accept this value and not present the menu when the value is already available.
This can be done by importing an entire database, such as is recommended in some manuals. However, in the debconf-utils package, there are some tools to help. Based on a helpful StackExchange post and confirmed by another helpful site, the following turns out to be the solution, assuming that the installer was downloaded into a package called ha.deb. I chose the qemuarm-64 machine, all choices are listed in the README on Github or in the Template definition.
The utility debconf-set-selections (manual here) to the rescue!
Later, I actually found a reference in the Debian wiki. The trouble sometimes is, to find the correct search terms. Especially for concepts that are getting to be quite ancient. Preseed is the way to go, apparently!
$ echo "homeassistant-supervised ha/machine-type string qemuarm-64" | sudo debconf-set-selections
$ sudo dpkg -i ha.deb
In order to check weither the selection has caught on, you could use debconf-get-selections or debconf-show:
$ sudo debconf-show homeassistant-supervised
* ha/machine-type: qemuarm-64

$ sudo debconf-get-selections|grep 'ha/machine-type'
homeassistant-supervised	ha/machine-type	Select	qemuarm-64
Debugging Zeroconf mDNS in Home assistant
Home assistant uses Zeroconf to provide mDNS services. This is the part that allows one to access the homeassistant webpage through the https://homeassistant.local:8123/ URL. It is a finnicky mechanism at the best of times, mainly because it uses multicast, which is difficult to debug. Let’s give it a go…
I installed avahi-utils on the host machine (this also installs avahi-daemon) and then one can browse with something like:
$ avahi-browse -alr
-    br0 IPv4 Home                                          _home-assistant._tcp local
-    br0 IPv6 Home                                          _home-assistant._tcp local
+    br0 IPv4 XKCD                                          _home-assistant._tcp local
+    br0 IPv6 XKCD                                          _home-assistant._tcp local
=    br0 IPv4 XKCD                                          _home-assistant._tcp local
   hostname = [a38a3e63fbd64ecb89b12a588ce7552d.local]
   address = [10.0.0.xxx]
   port = [8123]
   txt = ["requires_api_password=True" "base_url=http://10.0.0.xxx:8123" "internal_url=http://10.0.0.184:xxx" "external_url=" "version=2022.2.9"
It is not very easy to understand, but I think I understand that what’s wrong here, is the hostname: a38a3e63fbd64ecb89b12a588ce7552d.local. This should be homeassistant.local.
Trying to figure out where the mDNS is actually performed, it turns out that it is actually a component of Homeassistant Core, and the source can be seen in GitHub. This form of modern Python is not very easy to read for an amateur like myself, but I gave it a go.
And this is where it goes ‘wrong’. It seems that this was done on purpose, but I cannot claim to have enough understanding to follow this discussion. Perhaps there is a good motivation, but at the moment this seems to break the homeassistant.local address.
 info = AsyncServiceInfo(
        ZEROCONF_TYPE,
        name=f"{valid_location_name}.{ZEROCONF_TYPE}",
        server=f"{uuid}.local.",
        addresses=address_list,
        port=hass.http.server_port,
        properties=params,
    )
In an attempt to confirm this hypothesis, I manually edited the source to use a fixed server = homeassistant.local.. This was done by logging into the Docker (docker exec -it homeassistant /bin/bash and editing the source (somewhere around /usr/src/homeassistant/components/zeroconf). After a restart of homeassistant: it’s back to working as it should!
So, I wrote this up in an Issue. So let’s see what the developers make of this.
Using and debugging mDNS (zeroconf) name resolution
To test the mDNS, I installed avahi-utils on my Ubuntu host. This requires installation of avahi-daemon, which was not a problem. I also installed libnss-mdns so that mDNS is used as name resolution (otherwise, mDNS will not be used).
In order to enable libnss-mdns, the file /etc/nsswitch.conf needs to be edited. In effect, the hosts line is edited to add mdns in a few variants.
hosts: files libvirt_guest mdns4_minimal [NOTFOUND=return] mymachines dns mdns4 myhostname
This works instantaneously, which surprised me. Now, we can test by simply pinging a host, or by using getent.
$ getent hosts xyz.local
10.0.0.9       xyz.local
$ getent hosts homeassistant.local
10.0.0.99      homeassistant.local
A more detailed analysis can be done using avahi-browse:
$ avahi-browse -alr                 # for a detailed analysis of the entire landscape
$ avahi-browse _home-assistant._tcp # for a specific look at homeassistant
A similar test can be done on MacOS:
$ dns-sd -G v4 homeassistant.local    # lookup of a specific hostname
$ dns-sd -B                           # browse the entire network
$ dns-sd -B _home-assistant._tcp .    # browse only homeassistant
Bridge settings for zeroconf
The instructions for zeroconf mentions some settings required for the KVM/libvirt bridge in order for mDNS to work. I did not yet look at this, it seems to be working without!